Showing posts with label crafts. Show all posts

Monday, March 30, 2015

Just Do it Yourself, Magpie Girl!

I have wanted a beaded wrap bracelet for ages, but I just can't bring myself to pay the prices I see in stores and online. A Chan Luu one at Garnet Hill costs $168!  That's a bit much for a bracelet that probably won't last forever, I think. 

So, I finally just made one over the weekend, and guess what?!  It was incredibly easy. I was standing in the artsy craftsy store, oohing and ahhing over the pretty beads--the way we magpies tend to--and on a whim I looked up a couple of wrap bracelet tutorials on my phone. Turns out there are about a million of these tutorials online, so I won't give any instructions here.  I looked up "Chan Luu bracelet" on Pinterest, or you could Google the instructions, if you feel like making one (or 100--I think it would be easy to get addicted to making these).  

I spent about 20 bucks on beads and cording (I still have plenty left to make a second bracelet), and then settled in at home to craft for a couple of hours. Easy peasy. This one wraps around my wrist three times, and I attached a mother-of-pearl button I had in my button jar to keep it closed. 

Just thought I'd share this wee bit of magpie inspiration today. It couldn't have been easier once I got started, and I always like saving pennies while fulfilling my desire for sparkly things. 

Hope you all have a beautiful week, my friends!

Thursday, November 13, 2014

Fall Botanicals: Tips for Arranging Floral Patterns


Earlier this fall during my annual cleanup of the gardens, I began putting some of the colorful leaves, blossoms, and berries into a basket.  Their shapes and textures were so beautiful that I decided I needed to do something more memorable than just plunking them into a mason jar to keep on the windowsill for a few days.


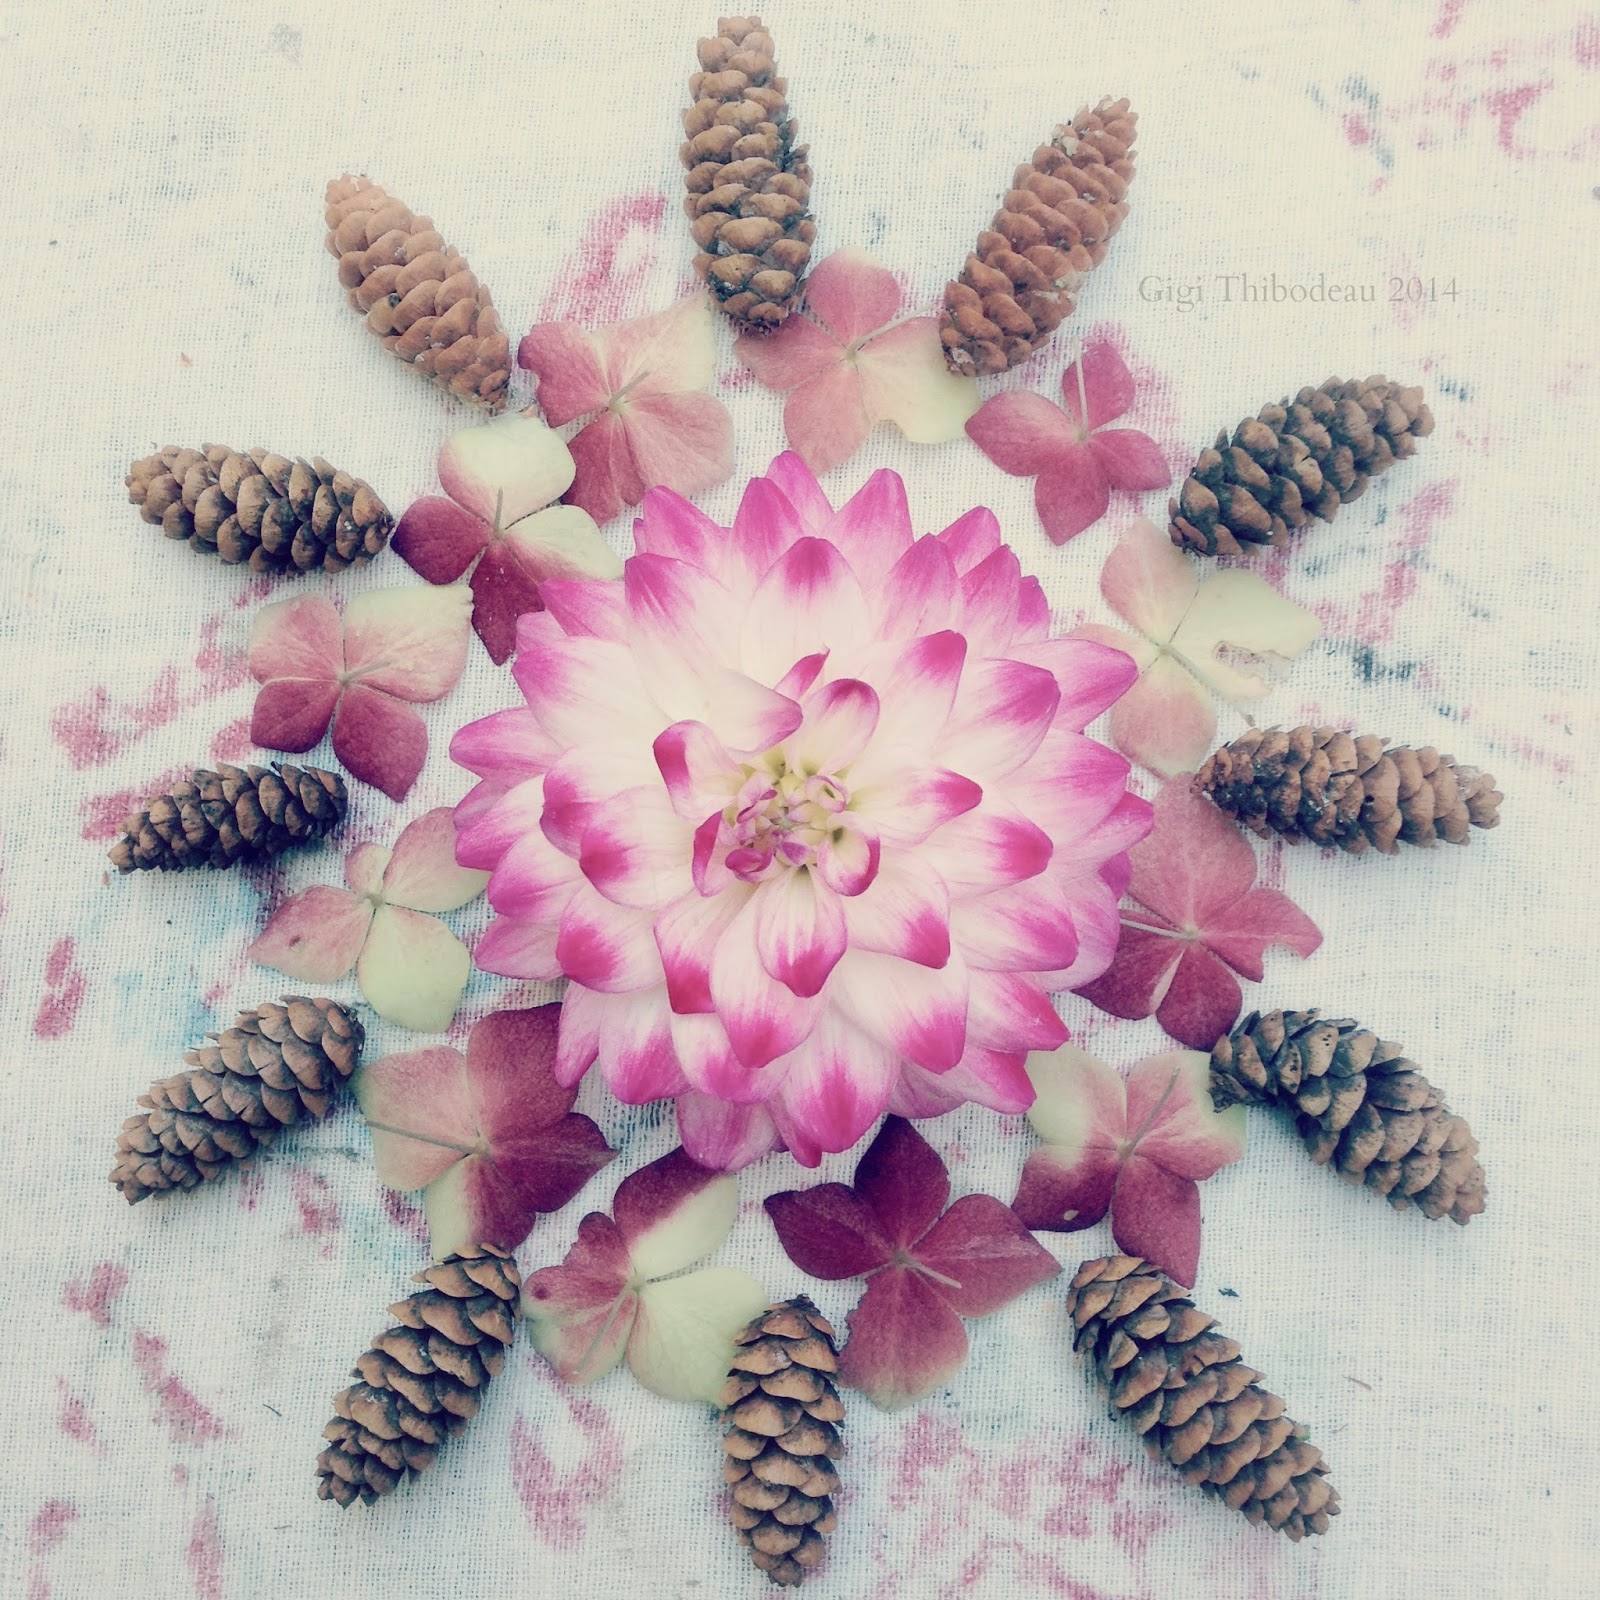
Using a worn old tablecloth as my makeshift backdrop, I arranged torn petals from marigolds, nasturtiums, and hydrangeas into simple medallion shapes on my picnic table.  I combined them with tiny pinecones and whatever else I could find in the yard, and then I grabbed my iPhone and snapped a few shots of the various arrangements.

I had to work quickly, as it was a chilly afternoon, and my fingers were growing numb, but I found that the more fanciful I got with the arrangements, the more I was loving them.  Later that evening, safely inside with a cup of Earl Grey, I processed the photos on my laptop and then shared a few of them in a post here on the blog, as well as on Instagram and Facebook.


I was quite surprised and touched by people's reactions.  Some folks even emailed to say that they thought I should turn the images into greeting cards.  I've been making and photographing more of the arrangements since then, and I had some prints done on Shutterfly.  I'm on the hunt now for some vintage gilded frames so I can hang the prints in our guest bedroom.


Today, as I worked on the latest in my "Autumn Gatherings" series, I took photos of the steps as I went along so I could share the process with you.  This isn't really a tutorial, since anyone can arrange flowers in beautiful patterns, but I have discovered a few tips along the way that really work for me, and I hope they may be helpful for someone else trying this.


First, the background is key.  If you want your arrangement to have a sort of vintage, nostalgic look, it's  helpful to begin with a vintage background.  Today I used this wrinkled, worn, and faded piece of Irish linen that I've had for years.  The colors of the flowers printed on it are just right as a backdrop to autumn leaves and branches.  (In fact, I used this same fabric as the background for my Artful Blogging post.)


Next, I gathered from our yard whatever flowers, berries, twigs, leaves, cones, and seed pods struck my fancy.  If your backyard happens to be more of a wooded forest, be careful, as some plants can be poisonous. 


Here in Maine, we're deep into autumn, but I still have a few hardy flowers blooming in my garden beds and in the pots on my front porch, so these were musts for me, plus some scarlet runner beans left on my arbor, and the last of the husk cherries in their lovely paper-lantern shells.  Various shrubs and woody perennials provided lots of great material, too.  The most important thing is to find an interesting range of textures, shapes, and sizes.  The colors this time of year tend to be fairly easy to harmonize.


Now that it's getting really chilly out, it's easier to work inside, so once I'd gathered my materials and placed any tender stems in water to stay fresh while I was working, I stationed myself on a large table on my sun porch, which was ideal, as it gets flooded with a particularly lovely warm, golden late afternoon sunlight this time of year.  


I began by playing with colors and shapes.  I tend to lean toward ovals and circles for my designs, but other shapes would, of course, be beautiful, too.  What I love about making medallion shapes is that you can have a beautiful, useable shot at almost any point in the assembly process.  If you want something as simple as the above mini pumpkin surrounded by geranium leaves, this would be nice as is.  You could move right on to cropping and processing the photo from here.  


I found myself smitten with this sweet little robin's nest that had fallen from one of the mock oranges bordering our yard.  I would never steal a nest from birds, but I do collect the windfall nests that I find on our property every autumn--or you could fashion a little nest yourself from twigs and moss.  This one just seemed like a perfect centerpiece for my medallion.


I love varying textures, shapes and colors, and then repeating certain ones for effect.  Once I had placed the yellow flower (the last one of the year from my porch planter) in the center of the nest, I knew that I would want to pick up on that yellow and accentuate it.  So, I simply played with possibilities.


Lamb's ears are particularly wonderful because of their silver-green color, their spear shape, and their fuzzy texture.  I love them contrasted with the azalea leaves that I've laid on top of them; the azalea's leathery texture and its burgundy color contrast beautifully with the lamb's ears, but both plants are the same basic shape, so there's some repetition, too, which is always pleasing to the eye.  The dark purple leaves radiating out from beneath the geranium leaves are from one of my many forsythias.  They repeat the same shape, but offer yet another color.  Plus, as yellow's complementary color, purple is a great back layer.  


As with any creative process, a huge part of it is trial and error for me.  I tried adding bits of pink begonia blossoms along with the purple and pink scarlet runner beans, but then the whole thing started feeling just a wee bit Easter-y, so I scrapped that idea and continued on.  This time I used much more autumnal petals of orange marigolds and red nasturtiums.


In the photo above I felt I was nearly finished, but I wanted one more layer to give it a sense of blooming out almost beyond the borders of the frame.  


My final step was to add some lavender leaves to the outer tips of the forsythias.  They pick up on the silver of the lamb's ears, and they also repeat the shapes of the central flower blossom petals.  I love that not all the leaves in the image are exactly the same size, and I never fuss over making things exactly symmetrical.  Perfectly imperfect suits my eye and temperament much more.

Finally, when it comes to processing the photos, I tend to play with lightening the exposure just a little bit.  I also sometimes blur the edges of the image, as I've done in the photo above.  Many of you are incredible photographers and much more brilliant than I at photo processing.  If you're newer to it, you don't even need to be a Photoshop expert.  Try using a simple online photo processor.  Most of them have loads of ways to give your photos a vintage look.  Or, simply snap away on your phone and use a processing app to get wonderful results.  If you want to see live examples of how others process their photos, YouTube is always a great teaching tool.  The version below is finished off with a final texture layered over the top of the image.  The texture is a photograph of another piece of old linen, which, once processed, gives an even more vintage look to the image.


Before I have Shutterfly print up my next round of photos (and my first batch of "Autumn Gatherings" greeting cards), I'll likely play with each image a little more, tweaking it until I'm satisfied with the results.  For me, the most important aspect of making this series is how much fun it is to create beautiful patterns from the bits and pieces I've gathered from my own backyard.  Now I can hardly wait to make the "Winter Gatherings" series.  I'm already imagining the dreamy Christmas cards.  Holly, pine, and arborvitae, here I come!


Saturday, December 14, 2013

Holiday Musings

Hello, chickadees!  Our part of the world is about to get hit with a winter storm that will keep us all shoveling and snow blowing for the next couple of days.  Mr. Magpie and I had plans with friends for the whole weekend, plans involving festive things like horse and carriage rides, holiday fairs, brunch, and long walks.  Most of those plans have been cancelled, which makes us sad, but we are consoling ourselves with a roaring fire in the fireplace and copious cups of tea on the sofa avec les chats. 

All in all, this Christmas season is turning out to be a wonderful one.  I've made a few twig wreaths, including the one above, using invasive vines we had cleared from the property.  No wires needed to make these simple wreaths.  Just weave the vines around the bottom of an old bucket to get started, and then you can finish the wreaths as natural, free-form lovelies from there.  Even better than the wreaths are the driftwood trees that my sister is making.  I will share a picture of the one she made me soon.

I'll be making my Maine Needham candies soon, too.  You can click this post from last year for my recipe.  If you like Almond Joys, you will love these candies made with chocolate, almonds (in my version), coconut, and potatoes.  Sounds crazy, but they taste divine.   

I know I'm partial, but I can't imagine a better place than Maine at Christmastime.  The morning that we went to our favorite tree farm, a light snow began to fall, turning the whole place into a snow globe.  As we tramped through the brambles in search of a tree that "needed us," as Charlie Brown would say, we could hear kids laughing and running through the trees.  Pure magic.  

And then there was the visit to the Holiday Open House at the Maine State Society for the Protection of Animals, a wonderful farm where they rescue horses.


I can't imagine Christmas without animals and long walks in wild places.  This Christmas we plan on going for a walk through one of our favorite bird-watching spots, Gilsland Farm.  We've been hearing about a lot of owl sightings in the area, so we're hoping for some good luck.  In our own backyard, the feeders have been visited by all the usual suspects, along with red breasted woodpeckers and lots of Carolina Wrens, which are a lovely tawny color against winter's snow and bare branches.  We've cracked open the autumn pumpkins to share with the squirrels and chipmunks, who have been feasting on them all week.

We are off to a holiday open house tonight to see friends and raise a cup of cheer before the snow flies.  It is bitterly cold outside, on its way to below zero in the next few hours, so I am worried about all the folks who don't have coats and mittens or even a roof over their heads tonight.  Wherever you are, I hope you are safe and warm and dry.  I hope you have a full belly, and I hope people you love are nearby--or just a phone call or a text away.  This can be a joyous time of year, but it can be incredibly hard, too.  May we all be able to give help when it is needed . . . and ask for help when we need it ourselves. 

xo Gigi 

Wednesday, January 16, 2013

Our Backyard Fairy Village


The snow is falling, falling today.  Our world is swathed in white, yet my mind keeps thinking of what lies beneath the snow--the fairy world we built last Fall with our niece.  Right now, the corner of our yard beneath the great Eastern White Pine looks like this:


But in the Fall, the village thrived.  


It all began with a pile of pinecones left by the squirrels for our niece.  We took the hint and went out gathering more building materials in the forest.  It was a rainy weekend, but we knew, just as the squirrels did, that the time was ripe for fairies, and the village needed to be built.


Once we had our supplies and had drawn up our plans--there was nothing left to do but build!


And I do mean build: ladders and swing sets and arbors and roads.  We fashioned street signs and wagons and tables and chairs.  Nothing was left unmade.  


So, as the snow falls and I sit inside finishing up piles of work, I thought I'd share some photos of our handiwork.  I'm not sure who loved building the village more, but I will say that Mr. Magpie is quite a carpenter when it comes to crafting fairy furniture!


"No child but must remember laying his head in the grass, staring into the infinitesimal forest and seeing it grow populace with fairy armies."

~Robert Louis Stevenson, Essays in the Art of Writing


The farmer's wagon above was made from half a gourd.  Mr. Magpie sliced a corncob to make wheels, which he attached to a bamboo skewer.  The wheels actually turned, and we filled the wagon with crops from the fairy farm, including sage and nasturtiums, of course!


The farm is pictured above.  Miss J and I planted cabbage and cauliflower crops (tiny flowers) and Mr. Magpie built a miniature wattle fence.  Dried hydrangea blossoms make wonderful rooftops for birchbark buildings.


Above is the restaurant--totally organic, supplied with veggies from the farm, of course--complete with birch bark table and benches. 


If you climb the ladder, you can go to the fab condos in the pine tree.


Miss J thought of everything for the village, including a hospital, a Senior Center,


pine needle roads edged with pinecone guardrails,


 a school (complete with a swing set by Mr. Magpie),


and even sculptures for the town square.


Among our favorite houses were the ones we made from pumpkins.  I think the fairies loved them, too. I know the squirrels found them delicious.  This one is topped by a little crocheted roof.


This wasn't the first time we'd built fairy houses with our niece, and I've posted about them before, but this is the first time we'd built them in our own yard, and I can say that it is about as fine a way to spend a day as I can imagine.


And the best part of building the village came later that night, when we peeked out our windows.  The fairies had come!

And they'd lit the candles we'd left them with their fairy wands.


"The iron tongue of midnight hath told twelve; lovers to bed; 'tis almost fairy time."

~William Shakespeare, A Midsummer Night's Dream